Netwerk 2010
Help the disk is full!
So against advices from IT-industry I did install my server as single-point of failure. This server runs both my website and mail-server. It runs a MySQL database, it is used for storing multimedia content and last by not least, it acts as file-server for the PC’s connected to my network by means of NFS. The server has been running smooth for long time already, the only draw back is its disk size of 120GB. With multimedia content from my camera and by ripping my CD’s approaching the point of "disk-full" has arrived. When some piece of software one day flagged "only 9GB of free space remaining" it was time to plan for a disk upgrade.
The boundary condition I had imposed on myself was that the content of the old disk should be copied to the new disk, all directories, files, links,... Not just user files but also the complete Operating System, Debian Lenny, should be copied. This should make a re-install of the operating system superfluous and at the same time should preserve the log-files with all their valuable contents.
The original 120 GB disk contained the operating system "/", a swap partition and a partition for the user files in "/home":
| Device | Size | Contains / mount |
|---|---|---|
| /dev/sda1 | 7G | |
| /dev/sda2 | Extended partition | |
| /dev/sda5 | 3G | Swap partition |
| /dev/sda6 | 109G | /home |
As the new disk was bigger but should contain basically the same structure as the old disk I decided to partition the new disk in the same way. So the structures of the old and new disks are identical, only their sizes differ.
Hardware
As the disk was part of a server and had to be big I decided to buy a Caviar Green (WDC WD10EADS) 1 TerraByte disk.
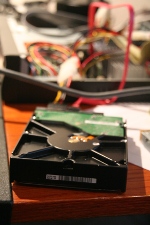
Although, Western Digital has payed attention to power consumption, which is important as the server is a 24/7 device.
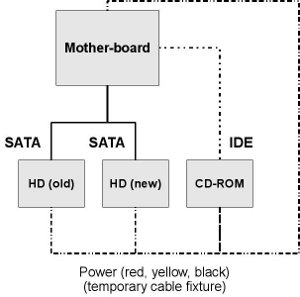
The next step was to take care of connecting the new disk to the server. To accomplish this I took a number PC power cables and hooked them together. In this way I was able to temporary power the two harddisks and a CD-ROM drive. The server motherboard had 2 SATA connectors so connecting the second harddisk was straightforward. Why the CD-ROM drive ?
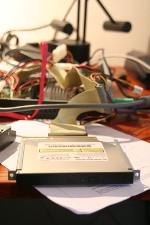
The server already had a DVD drive installed, but this TSST-drive contained buggy firmware. Shame on Toshiba and Samsung: I never updated the firmware as this could not be done from Linux. The bug in the drive makes the OS very slow as soon as disk-accesses occur. I always had bypassed the bug by removing the Linux kernel drivers for the CD-ROM. As I now needed to boot the server using a live-CD I could not remove these drivers and could effectively not bypass the bug. So I had to remove the TSST-drive. Luckily I did have an old CD-ROM drive and used this good old drive.
Software
The piece of software required to copy one disk to another is the Gnome Partition Editor: GParted. I visited it’s website, downloaded the CD-image (.iso) and burned it to a CD. Alternative sources of GParted are SystemResqueCD and Knoppix. Now with the CD in the drive, I booted the server, assuring it would boot from the CD. After a while I found the GParted desktop in front of me. Before I started GParted by clicking on the respective icon I started
Low level disk preparation
Via the Terminal the partition software "fdisk" can be started. I used "fdisk" to apply the low-level format to the new harddisk: creating the primary and the extended partitions and defining the root "/", the swap and the "/root" partition and their respective sizes. After "fdisk" was finished it was time to start GParted.
Copy the old to the new disk
The task I was challenged with, was to copy data from one disk to the second. Using GParted this task turned out to be simple, basically it is a copy-and-paste type of action. In GParted:
- select the old harddisk (/dev/sda)
- select the first partition to copy, /dev/sda1
- select Copy
- select the new harddisk (/dev/sdb)
- select the destination partition, /dev/sdb1
- select Paste
- hereafter select Apply
Now GParted will prepare the new partition, copy the data and will grow the partition to its new size. In my case the old partition was 7GB in size, the new 15G, so after copying 7GB GParted grew the partition from 7 to 15GB. On my hardware and with my disks the process copies approximately 1GB per minute. Copying the operation system partition therefore took about 10 minutes.
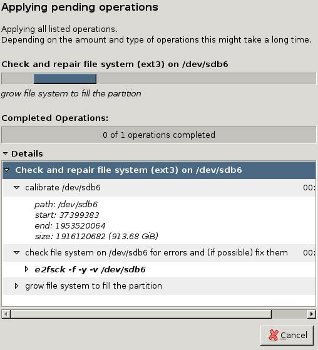
To copy the "/home"-partition exactly the same process was followed. As now 109GB was to be copied into a 900GB partition the process took close to 3 hours. So be patient!
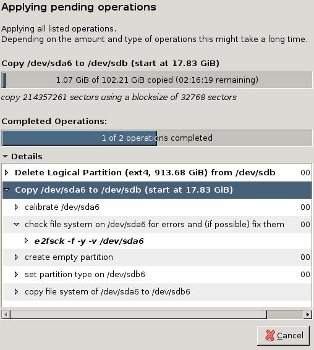
Unfortunately GParted crashed after the partition was completely copied but before the new partition was checked. Why it crashed is unclear to me. I restarted GParted and requested to Check the new partition. GParted started the check process and subsequently started to process to grow the partition to its new size.
Re-install GRUB
The last thing I had to do was to reinstall GRUB in order to make the server boot from the new disk. Again I opened up the Terminal and entered the following commands:
mkdir /mnt/hd
mount -t ext3 -o rw /dev/sdb1 /mnt/hd
chroot /mnt/hd bash
sbin/grub-install /dev/sda
Now I removed the GParted CD from the CD-ROM, physically disconnected the old drive, and rebooted the server. It booted nicely, now equipped with an 8 times bigger disk, and its disk contents fully identical to the old disk.